Showing posts with label blogger. Show all posts

Monday, August 27, 2012

How to Make a Blog Button

I finally added a blog button to this blog and I want to teach you how add one to your blog, too!

Here is my blog button! Feel free to put it on your blog and share the LOVE!! :)

Photobucket


In this tutorial, you will learn how to make a blog button in Power Point {although you can make a button in any design program - I personally use Adobe Illustrator} and how to add it to your blog in three easy steps.


STEP 1:

To make your own button, open Power Point, click on Design, and then Page Setup.


I would suggest making a button that is 160px X 160px 
which is 2.22in X 2.22in or 5.64cm X 5.64cm
On the Page Setup screen, change the slide to the following dimensions.


Then make a blog button using different shapes, colors, patterns and clipart to match your blog.  Click {here} to check out some great clipart and font resources. Make your button original and unique to your blog... don't be tempted to copy someone else's design or style.


After you have made you blog button, select all the different shapes and text boxes. To do this, hold down SHIFT and click on each shape. When everything is selected, continue to hold down SHIFT and right click on your button. Select "Save as Picture..."


Be sure to save it as a PNG: Portable Network Graphics Format.
{BTW: This step makes it so you don't have an unwanted, white box surrounding your image.}


-------------------------------------------------------------

STEP 2:

Next, you need to sign up for Photobucket, and don't worry, it's free. Click {here} to sign up.
After you sign up and you are signed into your account, click on the green Upload button.


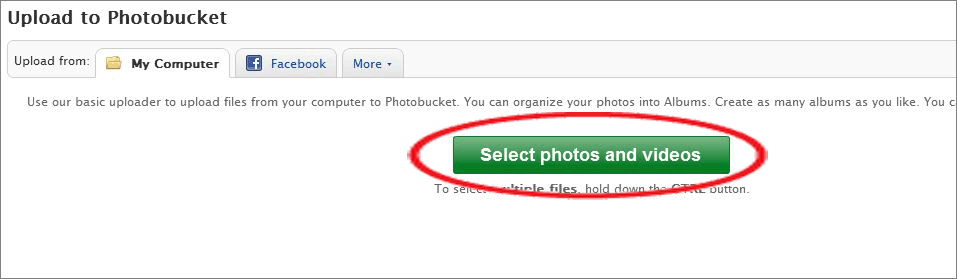
Then, click on the green button that says Select Photos and Videos and find your blog button.


When the upload is complete click on View Album.


Next, click directly on your blog button.


On the next page, you will see this box on the right side. 
Remember this, because you will need the Direct Link in Step 3.


-------------------------------------------------------------

STEP 3:
Open up a new window and go to your blog address. Make sure you are logged into your blogger account and click on design {it is in the upper right-hand corner}.


Then, click on Layout.


Next, click on Add a Gadget.


Add the HTML/JavaScript gadget.


Copy and past the following code into the Content part of the HTML/JavaScript gadget. Make sure to put your own blog address where it says, "PUT YOUR OWN BLOG ADDRESS HERE," and the direct link where it says "PUT THE DIRECT LINK TO YOUR BUTTON HERE." {BTW: The direct link can be found in step 2.} When you have added the correct code, click on Save.


This is the HTML code you need:


Now your faithful readers can put your button on their blog!!

Monday, August 20, 2012

"Back To Top" Button

On this blog {and my teacher blog} I have a "Back To Top" button in the lower right-hand corner. I love this button, because sometimes it's just nice to be lazy and take a shortcut back to the top. ;)

In this blog post you will learn how easy it is to add your own "Back To Top" button:


First, make sure you are logged into your blogger account. 
Then go to layout.


Then click on Add a Gadget.


Select the HTML/JavaScript gadget.


Next, copy and paste one of the following codes into the content box. 
{BTW: You don't need to put a title}. Then, click save.


Before viewing your blog, make sure you click on the "Save Arrangement" button.


Enjoy your new button!! I know your blog readers will!!!

Saturday, August 18, 2012

How to Start a Blog

I feel it is only appropriate that my first post on this blog is how to start a blog, especially since teachers are now a HUGE part of the blogging community.

 Most blogs are hosted through blogger {I'm sure you noticed that most blogs end with .blogspot.com}. I love blogger and I think it is really easy to use. Fortunately, blogger has created a VERY user friendly Blogger Tour. Click {here} to check it out. On this page you can learn what a blog is and how to get started. After reading through this tour, click on the orange "Create a Blog" button that is towards the top of the left column.


 Next, you will be prompted to sign up for a gmail account. You need to have a gmail account to create a blog. If you already have a gmail account, don't make a new one, just click on the "Sign in" button in the upper right hand corner. If you don't have a gmail account, create one by filling in the information below.


 The next page will bring you to your profile. You can add a profile picture if you want to, but you don't have to. Click on the "Next step" button.


On the next page, click on the "Back to Blogger" button.


The next page will be your blogger dashboard. Click on the "New Blog" button.


This is the fun part where you get to think of a blog address and blogger will let you know right away if that blog address is available or not. If I were you, I would avoid a blog address with a grade level in it, because if you change grades, you will need to change blog addresses. On this page you can also choose a blog template, but don't worry, it isn't permanent and you can change your template at any time. After you think of a blog name, address and pick a template, click on the "Create Blog!" button.


Now that you have set up your blog, it is fun to play around with the template and background!
Find that little arrow on the right side and a drop down menu will appear. Click on "Template."


Then click on the "Customize" button.


On this page, you can change the template, background, width, layout, and more. Feel free to play around until you get the results that you want. To change the background image, click on the word "Background" and then right below, where it says background image {where the arrow is pointing}.


From here you can choose your background image. Blogger has lots to choose from and they are all free! When you find the background you want to use, click on the "Done" button in the lower right hand corner.


When you have made all the changes you want to make to your blog, click on the "Apply to Blog" button in the upper right hand corner.


Good luck and welcome to the world of blogging!
 
back to top